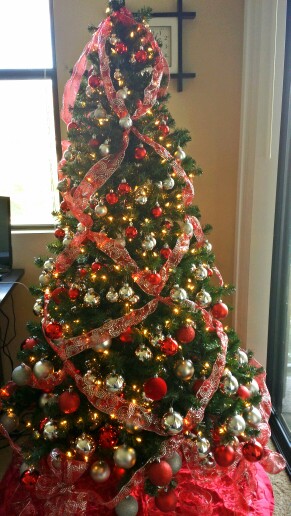
Want to Decorate Your Christmas Tree With Criss-Cross Ribbon?
Criss cross ribbon decorated Christmas trees are not just stunning, they’re also very stylish. This ribbon style will add texture and color to any tree, no matter the ornaments on the tree. The criss-crossed ribbon makes for a complete and beautifully luxurious look, and designer appearance. This concept works well with both pricey and economical trees. The style really adds to more economical trees that may not be quite as full, considering that people’s eyes are drawn to the ribbon on the tree, so areas that may not be quite as full, are not as noticeable. Considering that this design is relatively new, the technique provides a special option for anyone aiming to have a stunning and stylish looking tree this year, regardless of target tree budget. What you will need
Wired ribbon
Crafting wire or bread tie
Scissors
About 20-30 minutes
You can use any color or ribbon design you wish, just make sure that it is wired ribbon. I would recommend using ribbon that’s no broader than 2-3 inches, because this will make it a lot easier to criss-cross. How much ribbon will be needed? Depending upon the height and width of your tree, you will need 6 to 8 separate pieces of ribbon, each about two times the length of your tree.
For instance, if you have tree that is six feet tall, you will need six separate strands of ribbon that are about twelve feet in length.
Six ribbons will be plenty if your tree is slender.
If you have a Christmas tree that is really quite large, you will likely need to use eight strips, instead of just six.
Trees over eight feet high and that are three feet, or wider, will most likely require ten to twelve strips of ribbon.
With that in mind, don’t worry if you don’t have quite the right number of ribbon strips initially. You can quickly add or remove an additional ribbon, at the initial step.
Preparing Your Strips of Ribbon
Once you have cut your strips of ribbon, lay them lengthwise together and ensure that their patterns are all lying in the same direction.
As soon as you have them together in the right direction, tie the tops of one end of them together securely using a bread tie, or a rubberband, leaving abot 3 inches sticking out the top. That will be used to secure to the top of the tree.
Place Ribbons Over Tree, and Secure
Take the end your ribbons are tied together, and place at the top of your Christmas tree, draping the ribbon pieces around the sides of your tree, spread evenly apart.
Use a piece of the craft wire to tie the top of the ribbons to the top of your tree, under your tree topper.
Begin to Criss-Cross
As you start the next step, the first row will look a bit odd in the beginning. But don’t worry, it will all come together nicely as you move through the steps.
Starting with any two ribbons adjacent to each other and cross them about 12 inches from the top of the tree.
Twist these 2 pieces together a couple of times, pinching them where they cross and twisting it firmly so that the wire in the ribbon locks your first criss-cross in place.
Continue pairing the remaining ribbons and repeating the same steps as above to form your first row of criss-crosses all the way around your Christmas tree.
The Next Criss-Cross Rows.
For your next row, we’ll be dividing the existing pairs to create a new criss-cross pair. To do this take the left ribbon of a pair formed from the first row, and also from the pair just to the left, take the right ribbon in hand. These two will become a new pair.
With your new pair in hand, about twelve more inches down from the first criss-cross row, twist your new pair together a couple of times to begin forming your second row.
Repeat the above steps with the remaining ribbons, creating new pairs and criss-crossing them around the tree to form your second row.
You now have your second row completed. Repeat this process for your third row, and so on until you reach the bottom of the tree. Always making a new pair by dividing the pair from the previous row and criss-crossing the left ribbon from one pair with the right ribbon from the pair just to the left.
As you criss-cross down the tree, make sure that every other row’s new criss-cross know falls directly beneath the one two rows above it. For example, the criss-cross in the first, third, and fifth rows should line up from top to bottom. Likewise the criss-cross from rows two, four, and six should line up from top to bottom.
The Last Step.
Now at the bottom of the tree, if you have enough length for one last criss-cross, (without it touching the floor,) do one more. After you have done your last criss-cross cut the excess ribbon off and tuck into the base of the tree.
Once all rows are completed, adjust where any criss-cross knot needed, to make sure they are aligning with the knots on every other row, above and below. This will make sure your criss-cross ribbon looks symmetrical from top to bottom of your tree.
Congratulations, you have completed your first Criss-Criss Ribbon design on your Christmas tree. I’m sure you and your loved ones will love to spend time around the Christmas tree even more this year.

 Criss cross ribbon decorated Christmas trees are not just stunning, they’re also very stylish. This ribbon style will add texture and color to any tree, no matter the ornaments on the tree. The criss-crossed ribbon makes for a complete and beautifully luxurious look, and designer appearance. This concept works well with both pricey and economical trees. The style really adds to more economical trees that may not be quite as full, considering that people’s eyes are drawn to the ribbon on the tree, so areas that may not be quite as full, are not as noticeable. Considering that this design is relatively new, the technique provides a special option for anyone aiming to have a stunning and stylish looking tree this year, regardless of target tree budget. What you will need